Creating Docker images

The goal of this section is to learn how to create your own images. You will learn that docker itself is not all that difficult. What can make it difficult is what you want to do with it.
More and more developers are asked to learn more about their environment. Not just the language in which they program, but about the software and hardware they use. Many companies actually search for, so called, DevOps Engineers. So we are not only developers any more but also operators.
With Docker this is absolutely true. If you want to create a specialized docker image, e.g. a Payara application server already configured with a jndi jdbc connection and its drivers, you have to know (or learn) how to configure that in Payara and know how to do that from the command line.
In this section you will:
Get familiar with the
Dockerfilecommands.Learn how to define a
Dockerfile.Learn how to build and tag your images.
Build your own Jakarta EE application image.
Build a go application in a Multi-stage build.
Add functionality to an existing image.
Learn some best practices.
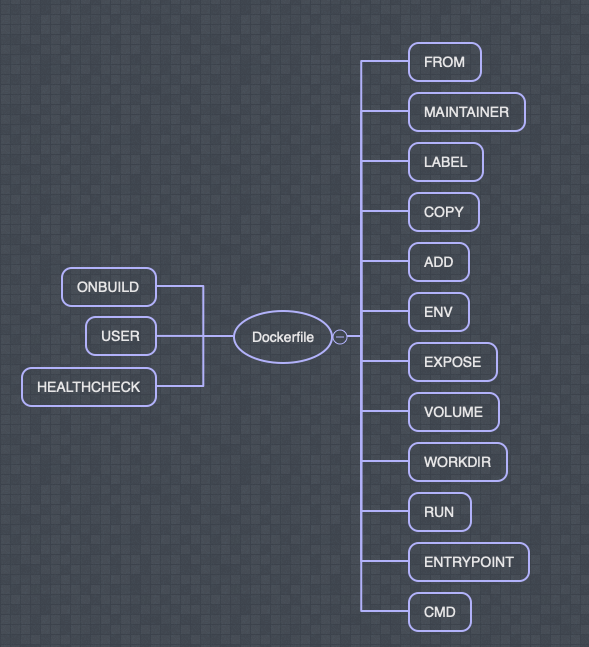
The above image shows all the Dockerfile commands available. Below a short description of these commands follow:
Dockerfile commands
FROM
FROM <image>[:<tag>] [AS <name>] initializes a new build stage sets the Base Image for subsequent instructions. As such, a valid Dockerfile must start with a FROM instruction.
MAINTAINER (deprecated)
sets the Author field of the generated images. It has been depricated. Use the LABEL keyword instead.
e.g. LABEL maintainer="cool@dude.com"
LABEL
LABEL <key>=<value> <key>=<value> <key>=<value> ...
The LABEL instruction adds metadata to an image. A LABEL is a key-value pair.
This metadata can be easily viewed with the inspect command.
COPY
COPY [--chown=<user>:<group>] ["<src>",... "<dest>"]. The COPY instruction copies new files or directories from <src> and adds them to the filesystem of the container at the path <dest>.
ADD
ADD [--chown=<user>:<group>] ["<src>",... "<dest>"]. The ADD instruction copies new files, directories or remote file URLs from <src> and adds them to the filesystem of the image at the path <dest>.
The difference with the COPY command is that it can also copy internet resources.
ENV
ENV <key>=<value> .... Sets the environment variable <key> to the value <value>. This value will be in the environment for all subsequent instructions in the build stage.
EXPOSE
EXPOSE <port> [<port>/<protocol>...]. Informs Docker that the container listens on the specified network ports at runtime. You can specify whether the port listens on TCP or UDP, and the default is TCP if the protocol is not specified.
VOLUME
VOLUME ["<PATH_HERE>"]. Creates a mount point with the specified name and marks it as holding externally mounted volumes from native host or other containers.
WORKDIR
WORKDIR /path/to/workdir. Sets the working directory for any RUN, CMD, ENTRYPOINT, COPY and ADD instructions that follow it in the Dockerfile.
RUN
RUN ["executable", "param1", "param2"]. Will execute any commands in a new layer on top of the current image and commit the results. The resulting committed image will be used for the next step in the Dockerfile.
ENTRYPOINT
ENTRYPOINT ["executable", "param1", "param2"]. Allows you to configure a container that will run as an executable.
CMD
CMD ["executable","param1","param2"]. Provide defaults for an executing container. These defaults can include an executable, or they can omit the executable, in which case you must specify an ENTRYPOINT instruction as well. There can only be one CMD instruction in a Dockerfile.
ONBUILD
ONBUILD [INSTRUCTION]. Adds to the image a trigger instruction to be executed at a later time, when the image is used as the base for another build.
USER
USER <user>[:<group>] or USER <UID>[:<GID>]. Sets the user name (or UID) and optionally the user group (or GID) to use when running the image and for any RUN, CMD and ENTRYPOINT instructions that follow it in the Dockerfile.
HEALTHCHECK
HEALTHCHECK <[OPTIONS] CMD command | NONE>. Tells Docker how to test a container to check that it is still working.
Hello world again
Let’s start with defining the Hello, world! image.
The Dockerfile below is the actual image definition used for the Hello, world! example from
the beginning of the Hands-on Lab.
FROM alpine:3.16

RUN apk add figlet

CMD ["figlet", "-w", "1000", "Hello, world!"]
The Dockerfile is a text file that defines a Docker image. The file contains a list of steps
that build up your image. You build this Dockerfile into an image and then it is ready to be used.
FROM: Every image is a derived from another image. This parent image is defined in theFROM. Inheritance continues until a base images is reached. A base image is build FROM scratch (finally there it is 😄).RUN: Used to execute a command during the build process of the docker image.CMD: Used for executing commands when we build a new container from the docker image.
Exercise
buildthe hello worldDockerfileyourself.pushthe image to the registry (Docker hub) under your account (don’t worry you can throw them away again later).Find it on Docker hub.
What version did the image get?
How would you give your image a specific version?
Can you see all the layers you created?
Attention
A Dockerfile must be created without extension. To do this in Windows, create the file with your editor of choice, then save it with the notation “Dockerfile” (including the quotes).
Hint
If you want to push an image, you need to build it with the tag: <your_acount_name>/<name_of_image>
Hint
If you get denied: requested access to the resource is denied you might want to try docker login first. This command you mostly only have to do once (ever), so is easy to forget 😄.
Attention
Consider skipping the pushing part of the exercise if you did not create a Docker account or the network is really bad.
Let’s get to something more useful. Let’s build an image from a java application.
Java Application
For this exercise it is a good idea to clone the repository mentioned in the Using the Docker command-line section, if you have not done so already (or copied from the USB stick)
In the docker-from-scratch/back-end directory you will find a spring-boot project. Note that you do not have to be a Java developer to do this exercise.
Exercise
How would you build (mvn verify or `mvn clean package`) this project with docker (!) if you do not have maven installed on your machine? (Optional brain teaser)
Note
As you can see docker is a great tool for experimenting with software. You can try stuff out and when you are done with it you can just throw the container/image away. You don’t have to pollute your host machine by natively installing everything you want to try out.
Exercise
Maven build the
back-endproject it will create atarget/back-end.jarfile.Create the
Dockerfilein the root of the back-end project with the following specs:Use a jdk 17 image as base
copy the jar file into the
/opt/app.jarin the imageexpose port 8080
make sure the container starts with the following command:
java -jar /opt/app.jar
Build the docker image and give it the name
back-endRun it so that you can see the following end-point in a browser (http://localhost:10000/api/quote)
How would you stop the
back-endcontainer?
--- Solution - build and run ---
--- Solution - Stopping the container ---
Payara example
Below you see a bigger example of an image definition. It is the definition of the
ivonet/payara:5.2022.1 image. It is a good demonstration of some docker
best practices. It also shows that the commands in the Dockerfile are not difficult but what
you do with it can add up to quite a bit of complexity.
Complexity not related to Docker but to installing the software you want on a linux distribution configured the
way you want.
Exercise
Try to explain to yourself what happens in the Dockerfile
FROM ivonet/centos-jdk:7-zulu17-jdk
LABEL maintainer="Ivo Woltring, ivonet.nl" description="Payara 5 Server Full"
ENV PAYARA_VERSION 5.2022.1
ENV PAYARA_ARCHIVE payara5
ENV DOMAIN_NAME domain1
ENV INSTALL_DIR /opt
ENV PAYARA_HOME ${INSTALL_DIR}/payara
ENV DEPLOY_DIR ${PAYARA_HOME}/${PAYARA_ARCHIVE}/glassfish/domains/${DOMAIN_NAME}/autodeploy
ENV PATH=".:${PAYARA_HOME}/${PAYARA_ARCHIVE}/bin:$PATH"
ENV AS_ADMIN_NEWPASSWORD secret
ENV USR serveradmin

RUN useradd -b /opt -m -s /bin/sh -d ${PAYARA_HOME} serveradmin \
 && echo "root:secret" | chpasswd \
 && echo serveradmin:serveradmin | chpasswd \
 && chown -R serveradmin:serveradmin ${PAYARA_HOME}

USER serveradmin
WORKDIR ${PAYARA_HOME}
RUN curl -s -o ${PAYARA_ARCHIVE}.zip -L https://s3-eu-west-1.amazonaws.com/payara.fish/Payara+Downloads/$PAYARA_VERSION/payara-$PAYARA_VERSION.zip \
 && unzip -qq ${PAYARA_ARCHIVE}.zip -d ./ \
 && rm -f ${PAYARA_ARCHIVE}.zip \
 && asadmin start-domain -d \
 && echo "AS_ADMIN_PASSWORD=">pwd.txt \
 && echo "AS_ADMIN_NEWPASSWORD=${AS_ADMIN_NEWPASSWORD}">>pwd.txt \
 && cat pwd.txt \
 && asadmin --host localhost --port 4848 --user admin --passwordfile pwd.txt change-admin-password \
 && echo "AS_ADMIN_PASSWORD=${AS_ADMIN_NEWPASSWORD}">pwd.txt \
 && cat pwd.txt \
 && asadmin --host localhost --port 4848 --user admin --passwordfile pwd.txt enable-secure-admin \
 && echo "https://stackoverflow.com/questions/46334485/glassfish4-jmx-configuration-using-asadmin" \
 && asadmin --host localhost --port 4848 --user admin --passwordfile pwd.txt set configs.config.default-config.admin-service.jmx-connector.system.address=127.0.0.1 \
 && asadmin --host localhost --port 4848 --user admin --passwordfile pwd.txt set configs.config.default-config.admin-service.jmx-connector.system.security-enabled=false \
 && rm -f pwd.txt \
 && asadmin stop-domain

VOLUME ["${DEPLOY_DIR}"]
EXPOSE 4848 8009 8080 8181
CMD ["asadmin", "start-domain", "--verbose"]
Looking at the RUN command you can see that many linux commands have been chained together into one RUN
command with \&&. This has been done with good reason.
The RUN, COPY and ADD commands in a Dockerfile will create a new layer that increases the size of the image
unlike the other commands.
Every time a new layer is created the other layer becomes fixed (immutable) and can not be changed anymore. That means that if you have dirtied the layer (e.g. temporary files, downloads, etc.) and did not clean up it is there to stay.
In the example above you see that a zip file with Payara is downloaded and unpacked. If these commands had
been done in separate RUN commands it would have been impossible to remove the zip again as it will still
be in the layer where it was downloaded. So it is a best practice to clean up after yourself and to keep the
images as small as possible. So by combining more commands in one RUN command you work within the same layer and can
clean up before creating a new layer.
Also the ordering of the commands in the Dockerfile is important because of build caching.
The Dockerfile will be build from top to bottom and will cache layers if possible to make future builds (much)
faster, but if a layer has changed all the subsequent layers will also be rebuild, so try to order the commands
in such a way that the layers least likely to change are at the top of the Dockerfile and the most likely
to change nearer te bottom, that way you have maximum usage of the caching system.
In order to keep your final image as clean as possible it is good to know what will pollute your target image and to use Multi-stage builds whenever possible.
Multi-stage builds
Imagine that you have the source code available of a golang app and that you need to compile it before you
can add it to your image. You can of course first compile it on your host machine and copy it to your image,
but as go compiles to machine executable code and your host might not be of the same architecture as your docker image
that might be difficult.
On the other hand you also do not want to build it inside your target image because your target image does not need the go compiler anymore after the code has been compiled. The target image will only use the compiled application.
This is where multi stage builds come into play.
The first image (the builder image) is the image you use to build the code and the second image will be the target image. The size and “dirtyness” of the builder image is unimportant as the image will not live longer than the build needs and won’t be part of the target image.
The layout of a multi-stage build is:
FROM <IMAGE_NAME> as builder

# your build actions here

FROM scratch

COPY --from=builder <compiled app from the builder image> <to the location in your target image>

CMD ["<the run command here>"]
You are going to build a go application which will compile linux executable code. As it is natively compiled code
it can run on the totally bare scratch image.
Note
The target image does not have to be scratch it can be any image you desire it to be.
Exercise
Create a multi-stage build for the go app in docker-from-scratch/images/multi-stage-hello-world.
Compile the go application in the builder image and use an appropriate image to do that
Get only the compiled code into your target
scratchimageBuild the Dockerfile and call it
gohelloRun it so that it removes itself as a container after running
Look at the sizes of the
golangimage you used to compile the code and the size of the resulting target image. Notice the difference?
Tip
The go language is called golang. Maybe it is a good idea to use that name when searching on the hub.
--- Solution - build, run and sizes ---
So now you have compiled a go application and created a runnable image out of the result without ever having installed the golang compiler on your host machine 👍!
Add to existing images
Sometimes you have an existing images doing almost completely what you want, but not quite. In that case it is very possible to specialize such an image.
Imagine that you have a Jakarta EE application, but this time we need a MySQL/MariaDB connection. In good EE style we want to make the Application Server responsible for this connection and let the application ask this connection trough the Java Transaction API (JTA).
But now you have the application server already as an image and because we want repeatable builds we need to add this connection to a new image and configure it to create the datasource we want.
It is not the goal of this course to teach you how Payara works. The solution will be provided. It is only here to demonstrate how you can add to an existing image.
FROM ivonet/payara:latest

ARG PWD
LABEL maintainer="IvoNet.nl"
ENV MYSQL_VERION="5.1.48"

USER root
ENV PASSWORD ${PWD}
RUN echo "AS_ADMIN_PASSWORD=${PASSWORD}">/opt/pwd.txt \
 && curl -s "https://repo1.maven.org/maven2/mysql/mysql-connector-java/$MYSQL_VERION/mysql-connector-java-$MYSQL_VERION.jar" -o "/opt/mysql-connector-java-$MYSQL_VERION.jar" \
 && /opt/payara/payara5/bin/asadmin start-domain domain1 \
 && /opt/payara/payara5/bin/asadmin --user admin --passwordfile /opt/pwd.txt add-library "/opt/mysql-connector-java-$MYSQL_VERION.jar" \
 && /opt/payara/payara5/bin/asadmin --user admin --passwordfile /opt/pwd.txt create-jdbc-connection-pool \
     --datasourceclassname com.mysql.jdbc.jdbc2.optional.MysqlDataSource \
     --restype javax.sql.ConnectionPoolDataSource \
     --property portNumber=3306:password=secret:user=root:serverName=mysql:databaseName=quote:useSSL=false quote_dbConnectionPool \
 && /opt/payara/payara5/bin/asadmin --user admin --passwordfile /opt/pwd.txt create-jdbc-resource \
    --connectionpoolid quote_dbConnectionPool jdbc/quote_db \
 && /opt/payara/payara5/bin/asadmin stop-domain domain1 \
 && rm -f "/opt/pwd.txt" "/opt/mysql-connector-java-$MYSQL_VERION.jar"
USER serveradmin
The important part to take away from this chapter is that it is very possible to create specialized images
based on other images. In this case we inherit from an existing Payara image and add a MySQL datasource
to it through the Payara asadmin command line tool. The MySQL driver is also added.
Static website
In the docker-from-scratch/web directory you will find an empty Dockerfile and a very simple website
in the site folder.
Exercise
Create a node based image for this site:
use a node version 17 image
It should be published on port 3000 (use the EXPOSE instruction)
You need to use
npm installat some pointThe
server.jsfile is the actual “server” which runs on nodeThe start command is something like: node server.js 3000 (Use the ENTRYPOINT command)
Build the image and call it
webTest it
--- Solution - build and run ---
Extra Credit questions
Exercise
Can you serve the same site with an alpine image as base?
And with a python image as base? Do you need everything in that case?
or with nginx as base with only the index.html copied?
--- Solution - Dockerfile - python ---
--- Solution - Dockerfile - nginx ---
Manually creating images
You can create new images based on another image manually by running that base image with an interactive shell
and manually installing the things you need en then creating a new image from it with the docker commit command.
The manual method to create an image is not reproducible and should be completely avoided.
Always use a Dockerfile approach as it is totally reproducible, and you can track changes
to the Dockerfile if you store it in a source control repository (git).
As it is a bad practice we will not go into it in more detail in this hands-on lab.
Start making your own images and have fun while doing it 😄!
Now that you have created a couple of images and have learned some best practices it is time to let all these images work together.