Composing images

The gif demonstrates how applications are pulled apart into many micro-services with specific functionality. Docker is a perfect partner for this way of working. Docker excels at doing one thing and one thing well.
Services need to work together and talk to each other and that is where docker-compose comes into play. It is also possible to do this with docker cli itself but docker-compose just makes it much easier.
In the Creating Docker images section you created some images and now it is time to let them talk to each other in a complete working system like in the drawing.
In this section you are going to compose a complete chain of services to make a working whole.
At the end of this section you should have a complete system running:
A static website image (node/python/nginx).
A spring-boot application running on java 17 image
A phpmyadmin console to work on the database if you so desire.
A standard MariaDB image with the quotes database configured at first run
Because of the application level isolation it is very possible and also very likely that different containers have a completely different technology stack. Because you are shipping all the dependencies with their correct versions in your image, you do not have to worry that your node application suddenly will not work anymore on another machine.
Very powerful stuff 😄! Hmm, I might have said that before…
Architecture
The docker-compose.yml file is a yaml file and is thus organized.
A typical docker-compose file looks something like this:
version: '3'

services:
  hello-world:
    image: ivonet/hello-world
    # more config if needed here

  other-service:
     # other services here

networks:
   # networks here

volumes:
   # volumes here
docker-compose CLI Reference
Below the most common docker-compose command line commands are listed.
Attention
Docker compose has been incorporated on newer versions of Docker Desktop but not yet all. Where you read docker-compose you might need to use docker compose (without the hyphen).
build
Is used to build the images for which a build is defined
$ docker-compose build             # Build all services
$ docker-compose build web         # Build the 'web' service
up
Creates all the containers based on the available services.
The -d will launch in daemon mode (detached mode).
$ docker-compose up -d             # Create all containers
$ docker-compose up -d web         # Create single container called 'web'
down
Stops and removes all containers, networks for the services defined in the docker-compose.yml file
$ docker-compose down              # Stops and removes all containers
$ docker-compose down web          # Stops a single container called 'web'
$ docker-compose down -v           # Stops and removes all containers and volumes
start
Start stopped containers of the services defined in the docker-compose.yml file
$ docker-compose start             # Start all containers
$ docker-compose start web         # Start single container
stop
Stops running containers for the services defined in the docker-compose.yml file
$ docker-compose stop              # Stop all containers
$ docker-compose stop web          # Stop single container
ps
Lists all the containers created for the services defined in the docker-compose.yml file
$ docker-compose ps
restart
This will restart containers of the services defined in the docker-compose.yml file
$ docker-compose restart           # Restart all containers
$ docker-compose restart web       # Restart single container called 'web'
Composing a system
Let’s start building a system, now that you know the basic structure and the most commonly used commands.
This is not a course for learning about MySQL and how to configure it, but it is good to see how it is done, because if you want to do a lot of fun stuff with docker you will have to learn these things.
MariaDB
First you need the database with a quotes table and some data. The file docker-from-scratch/quotes/quote_of_the_day.sql contains the
database creation script and some quotes.
version: '3'

services:
  db:
    image: mariadb:10.7.3
    volumes:
      - ./quotes:/docker-entrypoint-initdb.d
      - mariadb-data:/var/lib/mysql
    environment:
      - MARIADB_ROOT_PASSWORD=secret
    networks:
      - backend
    ports:
      - "3306:3306"

volumes:
  mariadb-data:
    driver: local

 networks:
   backend:
Exercise
explain “in plain text” what is defined above
add it to the
docker-compose.ymlin the docker-from-scratch projectrun it and fix possible errors
To be able to configure the mariadb service this way you need to know how the mariadb image has been configured to work. The only way
to learn this is to either study the Dockerfile of that image if available or by reading the mariadb image documentation.
--- Solution - run ---
phpMyAdmin
With a good IDE you can look at the database and in this case you can because we publish the port, but what if we do not want to publish the port but only make the database available to needed containers?
We will start by adding phpMyAdmin just to be able to see the database when we do not publish any ports.
version: '3'

services:
  db:
    image: mariadb:10.7.3
    volumes:
      - ./quotes:/docker-entrypoint-initdb.d
      - mariadb-data:/var/lib/mysql
    environment:
      - MARIADB_ROOT_PASSWORD=secret
    networks:
      - backend

  phpmyadmin:
    image: phpmyadmin/phpmyadmin:4.7
    ports:
      - "8888:80"
    environment:
      - MYSQL_USERNAME=root
      - MYSQL_ROOT_PASSWORD=secret
      - PMA_HOST=db
    depends_on:
      - db
    networks:
      - backend

networks:
   backend:

volumes:
  mariadb-data:
    driver: local
Note
The ports section in the mariadb has been removed
a network has been added where both the phpmyadmin and the mariadb have access to
now the only port published is the one from the phpmyadmin
Tip
The name of a service under services: is arbitrary and can be anything yaml allows.
It does become the network address (like dns name) for the service within its network.
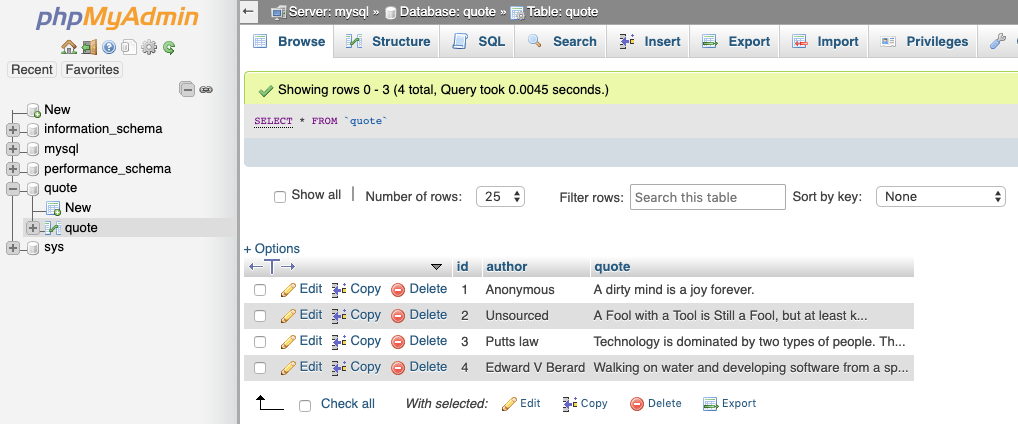
Exercise
Change the
docker-compose.ymlfile to represent the above yml definition.Run it and see if you can see the contents of the database through the console (usr:
root/ pwd:secret).Explain why you can still access the database even though it does not publish any ports.
If all went as planned you should see a screen like:
 --- Solution ---
back-end
Now that you have seen two examples you get to do the next one yourself. You have seen that
the docker-compose.yml file now has a working db with contents so now it is time to add
the back-end application.
Exercise
Add the the back-end application to the docker-compose file and call it quote-service.
Base it on the back-end image we created with the database connection configured to speak to
dbservice.Publish the service on port 8080.
Override the
commandof the image with:java -jar /opt/app.jar --spring.profiles.active=dockerLet it have access to the backend network.
The service
depends_onthemysqlservice.Go to the docker-compose documentation to see what
depends_onmeans.Run the docker-compose.yml file (can take a while to start).
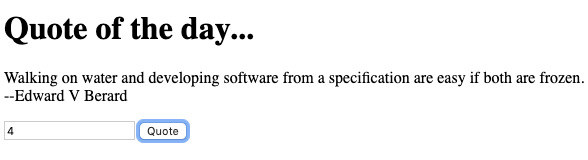
if all went according to plan you should see something like:
{
"author": "Unsourced",
"id": 2,
"quote": "A Fool with a Tool is Still a Fool, but at least know your tool fool."
}
So now you have a system where you already have an initialized database with a management tool and a java application running in a java 17 image. All you now need is a front-end.
front-end
Exercise
Adjust the
docker-compose.ymlwith these specs:Create a service definition called
web.Give it a
buildcontextpointing to./web.Image name
web.Publish host port 3000 to container port 3000.
Make sure that it only has access to a frontend network but also has access to the
quote-service..On what service does the
webdepend?
Build the web images with docker-compose (not docker!).
Run the whole composed system and fix possible problems.
Goto http://localhost:3000/ and try a quote.
If all went according to plan you should now see somthing like:
 --- Solution ---
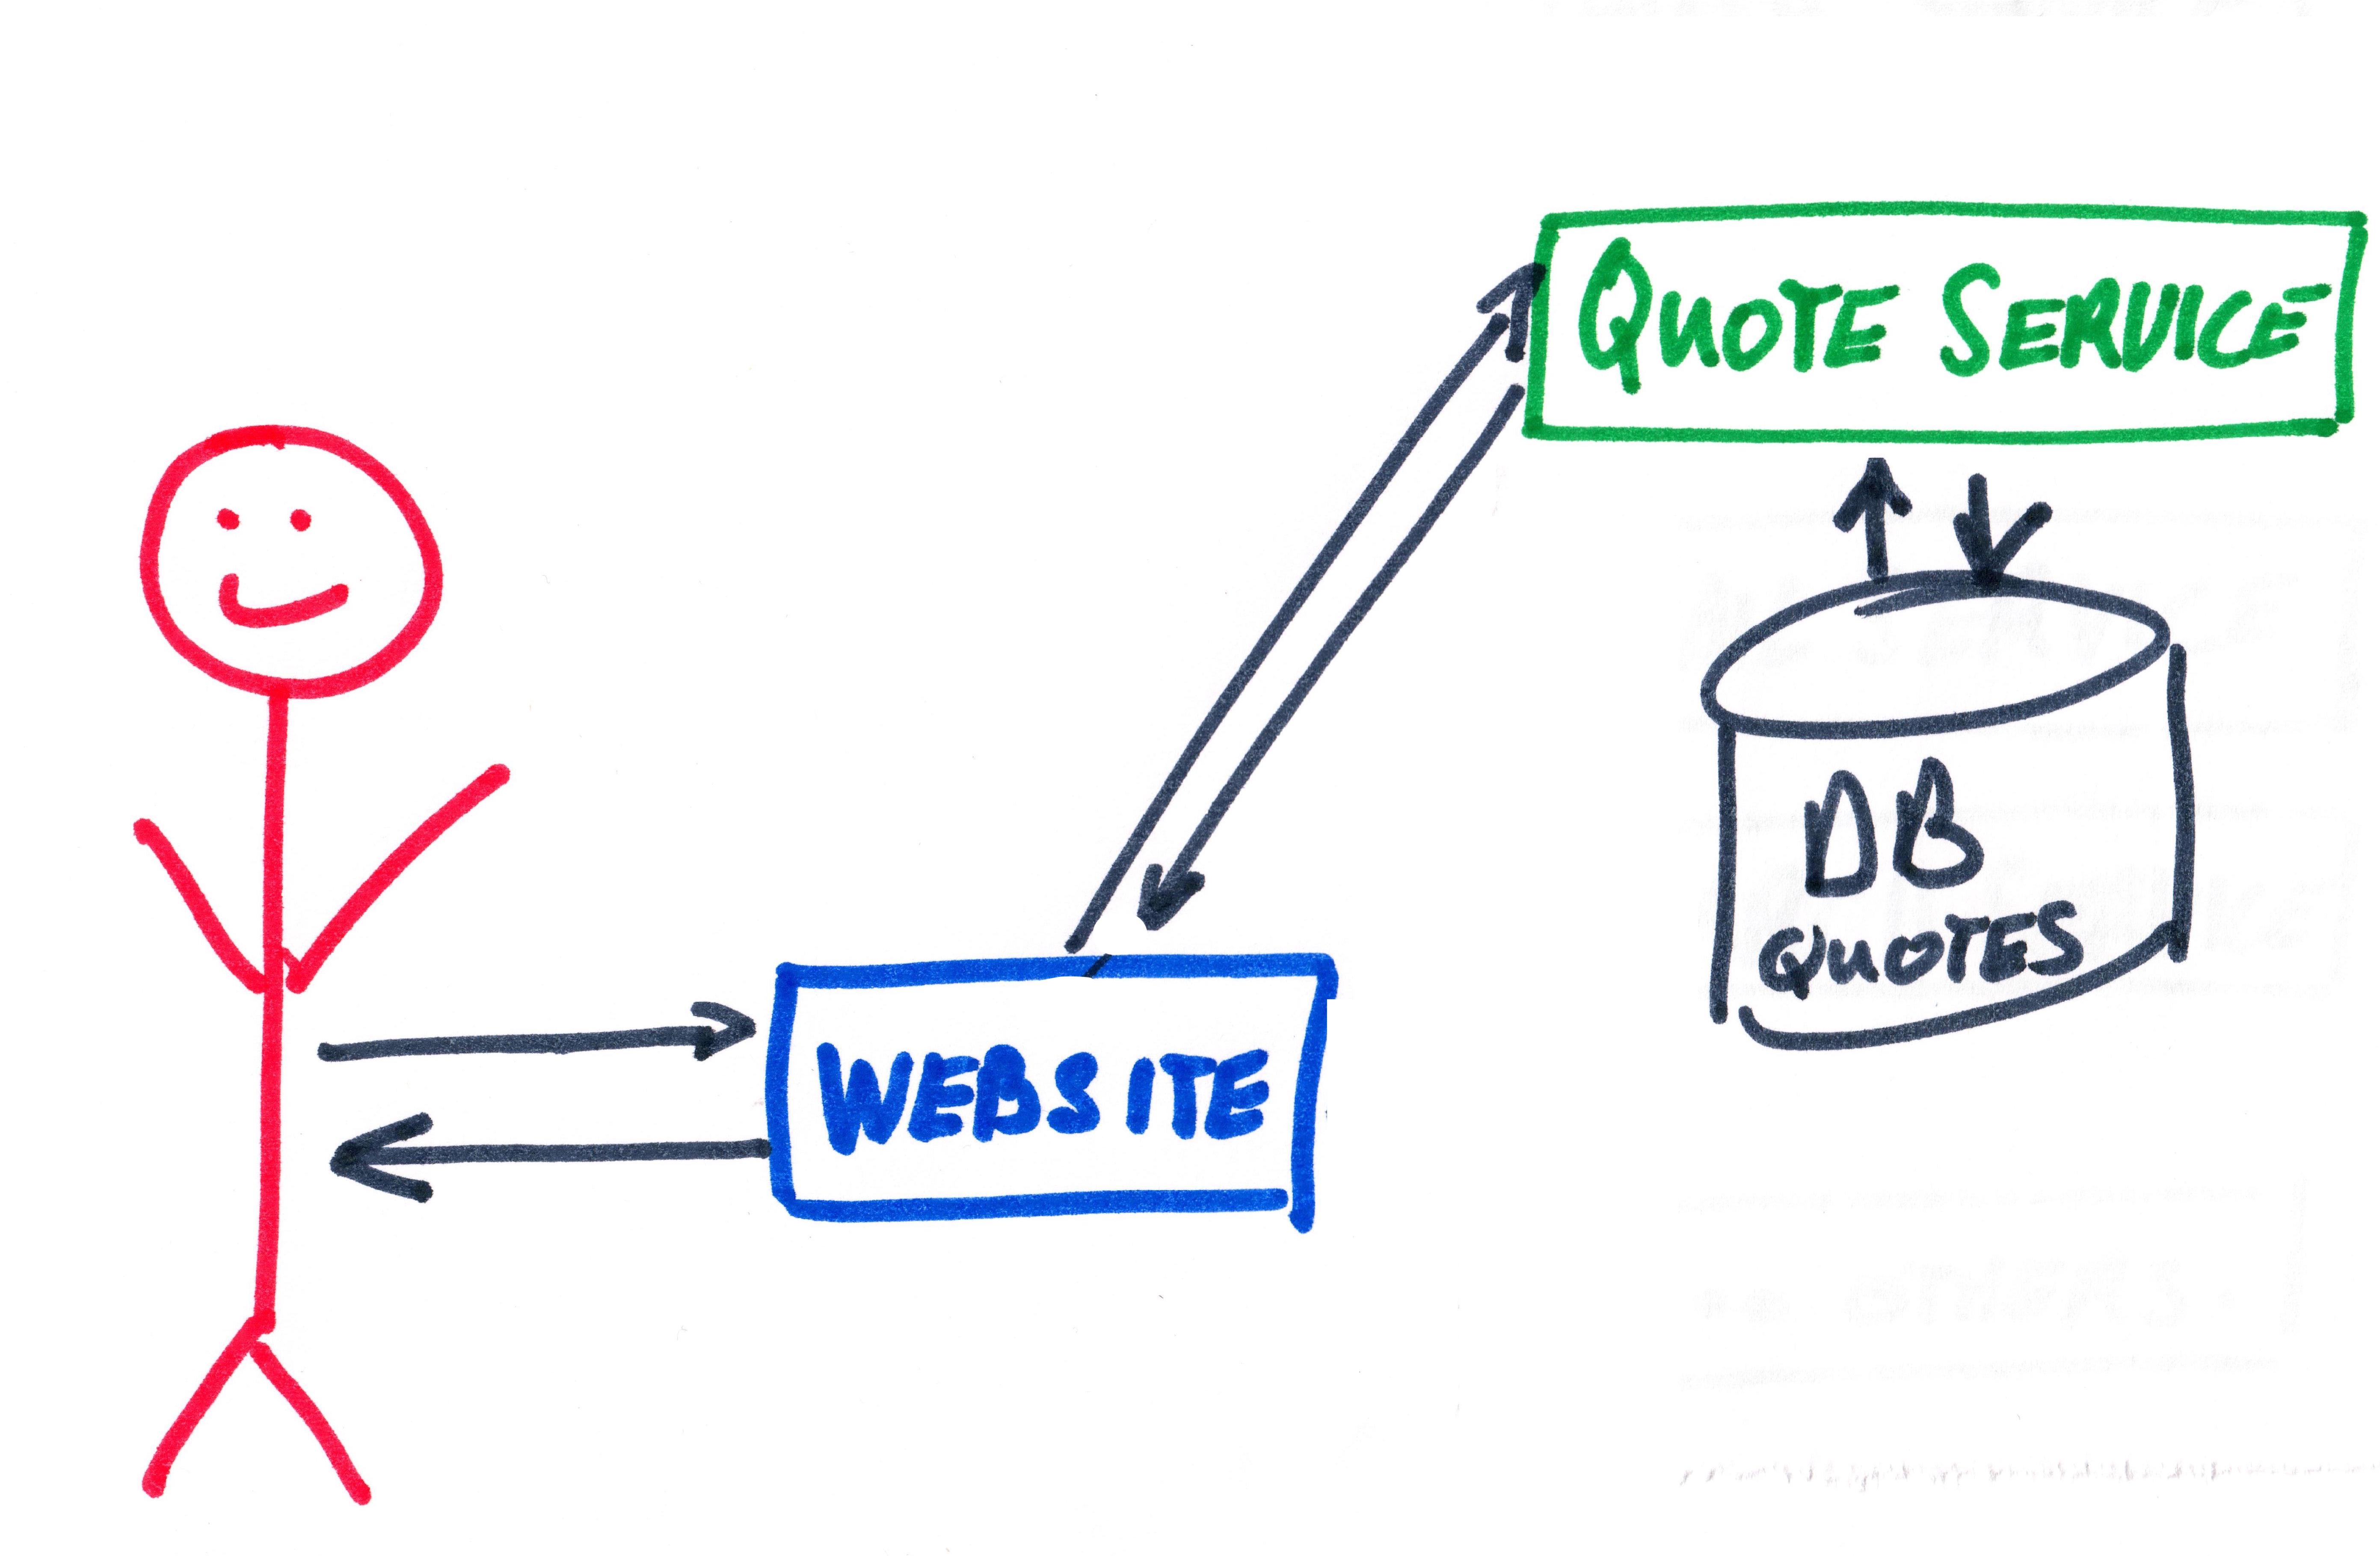
So now you have a complete system defined with docker images. The absolute beauty of this is that you can now develop and play with your system at your leisure. Bringing the whole system up takes mere seconds and removing it all is just as easy.
Imagine having this power in all your environments! hmm something to think about 👍!
If you are happy with your quotes you could even remove the phpMyAdmin section to make the database available to the quote-service only (more production like).
Finish
This ends the Hands-on lab. There is much more to learn like Kubernetes, Cloud etc, but you have a good grasp of the basics. Now it is just practice and having fun while doing it :-)
In the next section there is a handy recap of the Best practices.
Thanks for following this Hands-on lab. If you liked the course please leave a comment on twitter (@ivonet) it is always appreciated.
Greetz!
Ivo.